Windows Server上安装部署WordPress(5):IIS 固定链接URL格式设置
IIS 下 WordPress 站点的固定链接格式设置说明教程。在 Windows 操所系统上安装部署 WordPress ,本篇为 Windows Server 上安装部署 WordPress(5):IIS 下 WordPress 站点的固定 URL 链接格式设置。由于篇幅太长,所以把整个在 Windows 上安装部署 WordPress 分成了几篇来写:
- Windows Server 上安装部署 WordPress(1):概要
- Windows Server 上安装部署 WordPress(2):安装 MySQL
- Windows Server 上安装部署 WordPress(3):在 IIS上安装配置 PHP 支持
- Windows Server 上安装部署 WordPress(4):在 IIS上部署 WordPress 站点
- Windows Server 上安装部署 WordPress(5):IIS 下 WordPress 站点的固定 URL 链接格式设置
WordPress 初始化安装完成后,默认的 Url 链接格式是:https://blog.codeusing.com/index.php/%year%/%monthnum%/%day%/%postname%/,这是一种“比较好的链接”,但不是“漂亮的链接”、“友好的链接”。最常见、最通用的漂亮友好链接格式如下:
#1 包含分类目录、Url 别名:
https://blog.codeusing.com/category/post-name/
#2 只包含 Url 别名
https://blog.codeusing.com/post-name
#3 包含年、月、日、Url 别名:
http://example.com/year/month/day/post-name
与漂亮友好的链接格式相比,WordPress 默认“比较好的链接”格式多了 index.php,一般网站都不采用这种格式。通常网站会尽量采用简短、漂亮,对用户、搜索引擎友好的 URL 链接格式。
WordPress.org 官方关于固定链接的说明文档:
- 中文:使用固定链接
- 英文:Using Permalinks
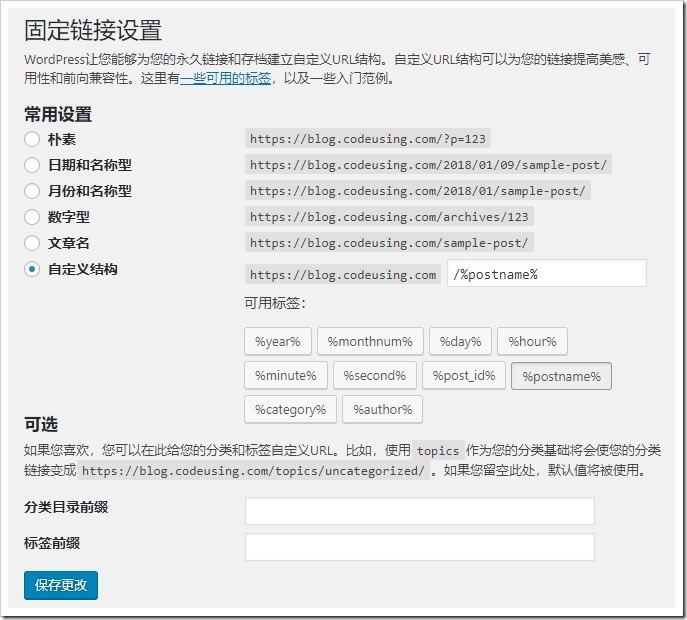
WordPress 固定链接设置
登录 WordPress 后台,点 Setting(设置) –> Permalink(固定链接)导航菜单进入固定链接设置界面,可以随意设置想要的链接格式。

IIS WordPress 站点固定链接格式支持
如果 WordPress 是部署在 IIS 上的,想要支持友好的 Url 链接格式,需要安装 URL Rewrite 模块支持。如果没有安装 IIS URL Rewrite,访问没有 “index.php” 格式的文章地址,如 http://demo.wordpress.com/hello-world,会报404错误:

下载 IIS URL Rewrite 模块:
- IIS Url Rewrite 模块微软官方下载页面地址: https://www.iis.net/downloads/microsoft/url-rewrite。
- 支持的 IIS 版本:IIS 7, IIS 7.5, IIS 8, IIS 8.5, IIS 10。–目前最新版本的 IIS 是 10。
打开下载页面后,滚动到页面最下边,可以看到各语言的 MSI 安装包下载,选择需要的下载即可。

安装 IIS URL Rewrite 模块:
1. 双击下载好的 .msi 文件,运行安装。

2. 安装完成后,打开 IIS,在服务器 Features View(功能视图),可以看到多了一个 URL Rewrite。

添加 URL 路由规则
上一步安装完 IIS URL Rewrite 后,你如果测试浏览 http://demo.wordpress.com/hello-world,应该还是会报 404 错误。原因是没有添加路由规则。
在 WordPress 网站根目录下,用文本编辑器打开 web.config 文件,在 configuration/system.webServer xml 配置节点下添加 rewrite 规则:
<rewrite>
  <rules>
    <rule name="Main Rule" stopProcessing="true">
      <match url=".*" />
      <conditions logicalGrouping="MatchAll">
        <add input="{REQUEST_FILENAME}" matchType="IsFile" negate="true" />
        <add input="{REQUEST_FILENAME}" matchType="IsDirectory" negate="true" />
      </conditions>
      <action type="Rewrite" url="index.php/{R:0}" />
    </rule>
    <rule name="WordPress: demo.wordpress.com" patternSyntax="Wildcard">
      <match url="*" />
      <conditions>
        <add input="{REQUEST_FILENAME}" matchType="IsFile" negate="true" />
        <add input="{REQUEST_FILENAME}" matchType="IsDirectory" negate="true" />
      </conditions>
      <action type="Rewrite" url="index.php" />
    </rule>
  </rules>
</rewrite>

再次测试浏览 http://demo.wordpress.com/hello-world,可以正常访问。搞定!

在WordPress后台进行设置的时候,发现问题来了,比如“设置-常规”界面,打开就是错误提示:
PHP Warning: 发生了预料之外的错误。WordPress.org或是此服务器的配置可能出了一些问题。如果您持续遇到困难,请试试支持论坛�? (WordPress无法建立到WordPress.org的安全连接,请联系您的服务器管理员。) in X:\*\wordpress\wp-admin\includes\translation-install.php on line 65
到网上搜相关解决办法,都是围绕怎么解决访问WordPress官方网站来的,我搭建在访问不到互联网的内网里面,实在是感到无奈。
后来自己尝试了一下,把line 65所处的if语句用/*和*/包起来注释掉了,就清净了。
对不住了博主,实在是你的这个系列写得太经典了,所以我遇到问题就来反映,把你的博客当留言板了,其实也是方便和其他人共享知识。不过没想到自己对编程只是感兴趣,却也能解决一些问题。
请教下在windows server 2012 上搭建的本地wordpress站点怎么才能被局域网其它电脑打开并登录wordpress后台呢
其它电脑浏览器访问你的站点地址:http://你的机器名后者ip:端口。
机器防火墙把端口设置为外部可以访问。
在windows server 2016上搭建的本地wordpress站点,点提交,最后都会显示PHP Fatal error: Uncaught mysqli_sql_exception: Access denied for user ‘username’@’localhost’ (using password: YES),wp-config-sample.php这个文件也改了,不知道什么原因
MYSSQL user 没有数据库访问权限吧。